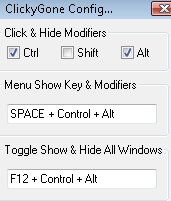
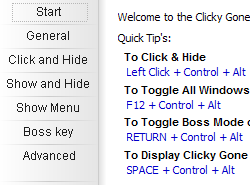
Subscribe to RSS feed आरएसएस फ़ीड की सदस्यता लें or या follow me मुझे का पालन करें on Twitter? पर चहचहाना?
Ubuntu 9.10 alpha has been around for some time now, and final version will be released later this year. Ubuntu 9.10 अल्फ़ा के आसपास कुछ समय के लिए रहा है, और अंतिम संस्करण बाद में इस साल रिलीज होगी. This tutorial will guide you in installing Ubuntu 9.10 (Karmic Koala) alpha using Parallels Desktop 4.0 on Mac OS X. I'm using build 4.0.3522 of Parallels Desktop. इस ट्यूटोरियल तुम 9.10 Ubuntu स्थापित (Karmic कोअला) मैक ओएस एक्स पर समानताएं 4.0 डेस्कटॉप का उपयोग मैं समानताएं डेस्कटॉप के 4.0.3522 बनाने का उपयोग कर रहा हूँ अल्फा में मार्गदर्शन करेंगे. When the final version is released, this will be updated to reflect any changes in install. जब अंतिम संस्करण जारी किया है, इस को स्थापित में किसी भी परिवर्तन को प्रतिबिंबित अद्यतन हो जाएगा.
Download Ubuntu 9.10 Karmic Koala डाउनलोड Ubuntu 9.10 Karmic कोअला
To get started, download the appropriate version of Ubuntu from the links below: आरंभ करने के लिए, नीचे दिए गए लिंक से Ubuntu के उपयुक्त संस्करण डाउनलोड करें:
- Intel x86 X86 इंटेल installer (choose this unless you want 64 bit Ubuntu) Installer (यह चुन जब तक आप 64 बिट Ubuntu चाहते हैं)
- 64 bit 64 बिट installer (choose this only if you have a Intel Core 2 or AMD64 processor) Installer चुनें (यह सिर्फ अगर तुम एक इंटेल कोर 2 या AMD64 प्रोसेसर)
Install Ubuntu Karmic Koala (9.10) on Parallels Desktop (Mac OS X) स्थापित Ubuntu Karmic कोअला (समानताएं डेस्कटॉप (मैक ओएस एक्स पर 9.10))
Some general instructions before getting started: hit left/right arrow to move from one option to another. पहले कुछ सामान्य निर्देश: शुरू छोड़ दिया / ठीक तीर मारने के लिए एक विकल्प से दूसरे में स्थानांतरित हो रही है. Where arrows don't work, use Tab. कहाँ तीर काम नहीं टैब का उपयोग करते हैं.
Open Parallels Desktop and click File > New Virtual Machine. खुला समानताएं डेस्कटॉप पर क्लिक करें और फ़ाइल> नई आभासी मशीन. 
Choose CD/DVD image and point to the ISO file you downloaded. आईएसओ के लिए सीडी / डीवीडी छवि और बिंदु चुनें फ़ाइल डाउनलोड की. 
Name it Ubuntu 9.10 (include the version number so as to identify it easily). नाम 9.10 Ubuntu (संस्करण संख्या इतनी शामिल हैं क्योंकि यह पता लगाने के लिए आसानी से). 
Upon clicking “Start”, the installation will begin. पर क्लिक करें "आरंभ", अधिष्ठापन शुरू हो जाएगा. 
Choose your language and hit Enter. अपनी भाषा चुनें और हिट दर्ज करें. 
“Install Ubuntu” will be selected by default, hit enter again. "Ubuntu स्थापित करें" डिफ़ॉल्ट रूप से चयन किया जाएगा, फिर हिट दर्ज करें. 
English will be selected as the language, hit Enter again. अंग्रेजी भाषा के रूप में चयन किया जाएगा, फिर हिट दर्ज करें. 
Choose your country and hit enter. आपके देश और हिट चुनें दर्ज करें. 
For keyboard layout, choose No (by using left/right arrow) and hit enter. कुंजीपटल लेआउट के लिए नहीं, (प्रयोग छोड़ दिया द्वारा चुन / सही तीर) और हिट दर्ज करें. 
If you use a standard keyboard, choose USA under “Origin of keyboard”. यदि आप एक मानक कुंजीपटल, कुंजीपटल का उपयोग करें चुनें संयुक्त राज्य अमेरिका के मूल "के अंतर्गत". 
Choose USA again – unless you have a non-standard layout. संयुक्त राज्य अमेरिका फिर से चुनें - जब तक आप एक गैर मानक लेआउट है. 
The installer will proceed, with a progress bar. Installer, एक बार में प्रगति के साथ आगे बढ़ना होगा. 
If you are on a home network, enter any name, I choose Ubuntu. यदि आप एक घर नेटवर्क पर हैं, कोई नाम दर्ज करें, मैं Ubuntu चुनें. Hit enter. मारो दर्ज करें. 

Select the region and city, to configure the clock. चुनें क्षेत्र और शहर के विन्यस्त करने के लिए घड़ी. 


For partition, choose “Guided – entire disk”, which will be the default option. विभाजन के लिए, चुनें "गाइडेड - पूरी डिस्क", जो कि डिफ़ॉल्ट विकल्प होगा. Hit enter. मारो दर्ज करें. 
Ensure that the disk chosen has the words “Virtual HDD” in it. सुनिश्चित करें कि चुना डिस्क शब्द "आभासी HDD उस में" है. 
Confirm partitioning by choosing “No” and hitting enter. चयन "के विभाजन की पुष्टि नहीं" और मार दर्ज करें. 

Enter your name, hit tab and then hit enter. अपना नाम दर्ज करें, टैब मारा और फिर हिट दर्ज करें. 
Enter your username (remember it, this is the login username), hit tab and then hit enter. अपना उपयोगकर्ता नाम दर्ज करें (याद है, इस लॉगिन उपयोगकर्ता नाम है), टैब मारा और फिर हिट दर्ज करें. 
Enter password and hit enter, and renter your password for confirmation. पासवर्ड दर्ज करें और हिट दर्ज करें, और पुष्टि के लिए अपना पासवर्ड किराये पर लेनेवाला. 

Encryption is not really important for a Parallels install, so choose No (by hitting Tab) and hit enter. एन्क्रिप्शन एक समानताएं के लिए महत्वपूर्ण नहीं है वास्तव में स्थापित है, तो नहीं चुनें (टैब मार से) और हिट दर्ज करें. 
Unless you use a proxy, hit tab (to navigate to “Continue”) and hit enter. जब तक आप एक प्रॉक्सी, हिट टैब का उपयोग करें ( "के लिए जारी रखें पर नेविगेट करने के लिए") और हिट दर्ज करें. 

Depending on whether your clock is set to UTC, choose the option and hit enter. निर्भर करता है कि आपके UTC घड़ी के अनुसार सेट, विकल्प चुनते हैं और हिट दर्ज है पर. 
You will be asked to eject Ubuntu disk. तुम Ubuntu डिस्क बाहर फैंकना कहा जाएगा. Since we have used a .iso file, Ubuntu considers it as the real drive. जब से हम एक. आईएसओ फाइल का इस्तेमाल किया है, Ubuntu यह असली ड्राइव के रूप में मानती है. To set up the real CD/DVD drive, hit Control+Alt to come out of Parallels, then click Devices, point to CD/DVD ROM 1 > Real CD/DVD ROM > (whichever real optical drive you have). तक असली सीडी सेट / डीवीडी ड्राइव, नियंत्रण हिट + ऑल्ट को समानताएं से बाहर आया, उपकरण क्लिक करें, सीडी को मुद्दा / डीवीडी रोम 1> रियल सीडी / डीवीडी रोम> तो (जो भी असली ऑप्टिकल ड्राइव आपके पास). ![]()
click to enlarge बड़ा आकार देखने के लिए क्लिक करें
Since we have used a .iso file, you do not have to eject anything. जब से हम एक. आईएसओ फाइल का इस्तेमाल किया है, तुम कुछ भी बेदखल करना नहीं है. Hit tab to get to “Continue” and hit enter. मारो "टैब के लिए जारी रखें पर पाने के लिए" और हिट दर्ज करें. 
Ubuntu will reboot. Ubuntu रिबूट जाएगा. 
Let it complete the reboot and reach the login screen. इसे पूरा करने और रिबूट लॉगिन स्क्रीन तक पहुँचने. 
Enter your username and password to log in. अपना उपयोगकर्ता नाम और पासवर्ड दर्ज करें अंदर प्रवेश के लिए 
Here's the Ubuntu desktop, booted for the first time. यहाँ Ubuntu डेस्कटॉप है, पहली बार के लिए हटा दिया गया. 
It is a good idea to update all software (and do so every week or so) – the advantage of Linux is the frequent security updates and patches. यह एक अच्छा विचार के लिए सभी सॉफ़्टवेयर अद्यतन है (और ऐसा हर हफ्ते या ताकि) - Linux के लाभ अक्सर सुरक्षा अद्यतन और पैच है. To update, click System > Administration > Update Manager. को अद्यतन पर क्लिक करें सिस्टम> प्रशासन> अद्यतन प्रबंधक. 
Hit Check to refresh updates. मारो को अद्यतन ताज़ा की जाँच करें. Then, enter your password and hit OK. फिर, अपना पासवर्ड दर्ज करें और ठीक मारा. 
If Update Manager shows any new updates, check them and hit “Install Updates”. अगर अद्यतन प्रबंधक कोई नया अद्यतन, उन्हें जाँच करें और हिट "Install अपडेट से पता चलता है."
Parallels Tools will be available for Ubuntu 9.10 soon after the final release, so we will update this tutorial when it is available. समानताएं उपकरण 9.10 Ubuntu के लिए उपलब्ध जल्द ही अंतिम रिलीज के बाद, तो हम इस जब यह उपलब्ध है ट्यूटोरियल अद्यतन हो जाएगा.
Related reading संबंधित पठन
- Install Ubuntu Linux themes स्थापित Ubuntu Linux विषयों
- How to install Save for Web GIMP plugin in Ubuntu कैसे Ubuntu में वेब जिम्प प्लगइन के लिए संचय करें स्थापित करने के लिए
- How to install Arial, Verdana, Windows fonts in Ubuntu कैसे Arial, Verdana, Ubuntu में Windows फ़ॉन्ट स्थापित करने के लिए
- Ubuntu-Book: Macbook owner installs Ubuntu on a Macbook? Ubuntu-बुक: मैकबुक मालिक एक मैकबुक पर Ubuntu स्थापित?
Thanks for the great blog post, I just tweeted it महान ब्लॉग पोस्ट के लिए धन्यवाद, मैं अभी tweeted
Thanx, for the help,Nxt computer will be a Mac Thanx, मदद के लिए, Nxt कंप्यूटर एक मैक होगा
Hi, Have you had trouble installing Parallel Tools after that? नमस्ते है, तो आप मुसीबत के बाद कि समानांतर उपकरण स्थापित किया था? I am having difficulty with that. मैं उस के साथ मुश्किल हो रहा है.